Wednesday, March 30, 2016

'Painting' A Garden Trowel

Today's lesson is my go-to garden tool.  The garden trowel.  It is an easy lesson as well because it is a painted trowel.  So it is perfect for you to give it a try!

The Daily Art Hub design collection is called Gardening Things and you can find the entire collection here.   This is the collection that I had picked out originally when I saw the article in Creative Machine Embroidery.

You can find the find the jpg file for the trowel here.  Right click on the image and "Save AS".  Create a new folder called "Garden Tote Tutorial" and save all of your designs there.


The first step (after you open the software and 'work through the wizard') is to Select NEW  and then load the jpg and select the Oval hoop with foot #93 in the Artwork Source screen.


Then select the Trace (Convert to Outlines)  option.


Then select Trace


Then select Finish.   Your screen should look like this.


Now wasn't that EASY?! The traced design is loaded ON TOP of the backdrop.


Now we need to be able to see how large our design is and if it will fit into the pocket area. To do that we have to OPEN a new file and load it into the software. Select Open and locate where you saved the Rectangle shape_DRAW file that you created.

Here is the file if you have yet to create your own.


Then COPY (right click on the file) and PASTE (right click on the file) the design onto the trowel screen.  Change the rectangle to a Running Stitch with a Length of 3.5".  This will be our basting box.


Drag the rectangle off of the design and place it to the side.  We will now work on the trowel design.  You will drag it back onto the hoop when you are ready to resize the design.


Notice the white background behind the trowel?  The next step is to grab it and delete it.


Done!


Then we need the trowel going in the other direction. So type in 270 degrees in the ROTATE box in the Tool Options.


The trowel in the background is the Artwork image.  If you would like to HIDE the image, follow the sequence below by Right clicking.

>VIEW>Backdrop>Hide

If you drag the rectangle back onto the image, you can now see that the design is too large for the space.


So drag the rectangle back off the image.  Grab the rotated image and using the resize handles, drag it to fit inside the rectangle.


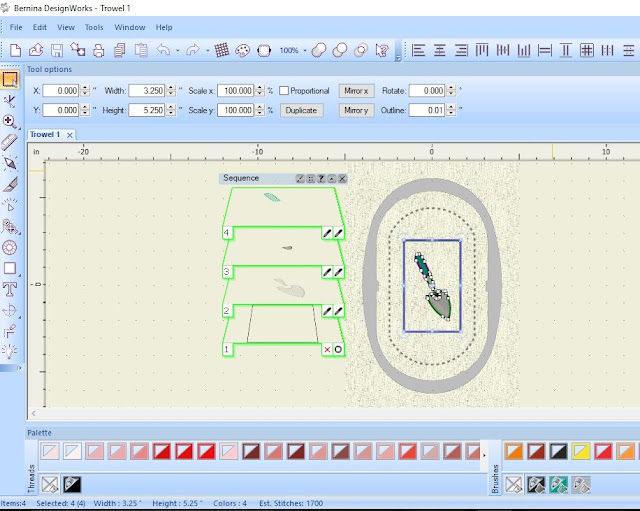
After I resized it to fit into the rectangle, I added both an outline and fill for each color.  Notice the 'paint' chips on the lower right of the photo below.


Remember, I changed the Rectangle from a Paint line to a Running stitch 3.5" in length.  This is the basting box for the design.

Drag the rectangle to the beginning of the Sequence Manager so it will stitch first.  Right click on the both of the light gray parts of the trowel and select Combine.   This will paint both sections at once.  

You can find the finished DRAW file here.  This file can only be opened in the DesignWorks software.

FILE>OPEN>trowel 1.DRAW

You can find the finished EXP here.  This file must be opened in V7 or Artlink first.  You then must send it to your machine or USB stick to paint it out.

FILE>EXPORT>Bernina

I then tested out my paint design.  I used two Fabrico ink pens ( my gray is almost gone!) #165 Pine and #181 Cool Gray plus Eddings #12 Gray.


I lowered the green pen closer to the canvas because I didn't like the striped effect.  


I centered the design using the "bullseye" screen and the marked horizontal and vertical lines.  My rectangle is 'spot on' the top markings are wrong...


The fabric must have shifted slightly while painting but I called it good!


Thanks for hanging in there with this super long tutorial!


Why not give it a try?!


Thursday, March 24, 2016

Sewing the Garden Tote Lining

Another quiet day at the Bernina Center- I swear EVERYONE knows when the owners are on vacation!

SOW I was able to stitch the lining of the Garden tote and take pictures of my steps along the way!


The first step was to top stitch 1/2" from the edge of both lining pockets.  Then pin them to the bottom edge of the lining and baste along the sides and bottom.

The last step is to stitch down the center of both lining pockets. Sew the narrow lining sides to each long end of the wide lining base using a 1/2" seam and press.

You Garden Tote lining should look like the picture above.

The next step is to sew the lining to the bottom of the piece pictured above.


Clip the long edge to the bottom of the lining.  I love these NEW clips!


Quilters Perfect Klips - bigger and a better price point!


Then sew the short ends from side seam to side seam 
and your bag base is finished!


Then turn down the top of the lining to the inside 1/2 " and press.


That was easy, now set it aside!

The last step I was able to accomplish was the outside narrow panels with pockets.  Fold the pockets following the pattern directions. Press with lots of steam. Clip to the canvas narrow side panels and stitch.


That is all we are able to do at this time.  I like to complete as much of the bag as possible before I move on to designing with DesignWorks.  I now have a vision in my mind of how the finished tote will look.

Next week..... Let's start designing!


Wednesday, March 23, 2016

Cutting and organizing your pattern pieces.

I must admit that I had to read these directions several times!  I was having the worst time trying to figure out the pattern pieces to this pattern.  We had a few 'quiet' days at work and I was able to work on this project.  After it is finished, I will add it to my DesignWorks corner at the store for some DW inspiration!

The first step I cut two 6" x 25" pattern pocket pieces. I decided to cut them slightly larger than the pattern to allow for shrinkage.  I then marked a center line horizontally at 3"  and the vertical sections from the pattern.  I used a black Frixion pen but you can use any one of your favorite marking tools.


I cut out ONE Garden wide base 1/2" larger than the actual pattern but first drew the outside lines with the Frixion pen.  I have an design in mind for the top center of the bag.


I then cut the remaining pattern pieces from the canvas fabric and backed all of my pieces with Decor Bond.

I also selected my lining and a contrast for the lining pockets and trim.  I followed the directions to back those pieces with fusible fleece.


Ooops..  I took a picture of the wrong side.  You will see the correct sides tomorrow, I hope!


I topstitched the top edge of all 4 pockets with a 1/2" seam.


Coming tomorrow!!.......stitching the lining.


Monday, March 21, 2016

Let's Get Started!

It was a beautiful Spring day yesterday and this morning, it is cold!  I am sure some of you are waiting for spring to arrive....

SOW let's give Spring a jump start! The first step I did was to scan the pocket pattern with the marking for the size of each pocket.


You can scan the pattern directly from the program or use your scanner and save the file a a jpg.


Then draw a rectangle around the pocket shape to create a template for each design.  


The actual size of the opening is 3.25" x 5.25".  Re-size the rectangle using the Width and Height section in the Tool Options.


Select the Oval Hoop with the #26 foot and go to the View Drop down menu and Hide the Backdrop.

Right click>View>Backdrop>Hide


Save the design as "Rectangle work space_DRAW".  This will be your workspace for each of the pocket designs.

If you are like me, you still need to cut out and prep your fabric. This week is going to be a very busy week for me!  So that is all I am going to get done this week.

I hope to be able to get a few blog posts posted this week, but I am not positive.

The first step I need to do is find the  lining for this tote.  I already have a fabric picked out at the store...I will keep you posted!


Friday, March 18, 2016

Garden project design ideas

Well, my spring garden is starting to shape up. My Easter lilies are popping up but I doubt I will have any flowers for Easter.   How is the weather where you live?  Soon warm weather will be here, and this Diva will be inside!

I mentioned another time that I am a member of the Daily Art Hub club.  Their designs are perfect for this software.  They are basically 'flat' and can adapt to the paintworks and cutworks quite easily.  I can share the designs as long as I give credit to the Daily Art Hub site.  Take a look at all of the designs they have to offer and they share a FREE set each day.  Here is the link...

Here are a few of the collections that I selected for my Garden tote.


I will probably pick one from each collection to share.  If you have been saving their 'freebies' then some of these have been shared  and you may already have them.  So of course, you may create your own design using whatever design you like!

Coming Monday...  I will share how to cut out the tote pocket piece and prep it for the designs I have selected.