Today's lesson is using any one of the Colorful Birds, since they are all the same - just different colors!
I selected the orange bird but as you can clearly see, everyone is exactly alike!
You can find the jpg for the bird here.
Follow the same steps as the trowel including resizing the design to fit into the rectangle. This time I did not set a specific size but I tried to make it fir nicely inside the rectangle. As always, I set the "x" and "y" axis at 0 and this centers the design in the middle of the hoop.
I did HIDE the Backdrop because it was distracting. You can review the steps following this post here.
Today's lesson is a combination of Paintworks and Cutworks using the Bezier drawing tool.
If you need a lesson or a review of the drawing tools, check out the video below.
Before I started 'painting', I changed the palette to the Eddings markers. This way I could select the colors from the paint pens I already own.
I started with the tail feathers and changed the color using the Eddings markers that I have on hand. I then changed the FILL to a Zigzag and the DENSITY to 1.30.
I colored the beak red, the feet brown and the eye black. Remember the Eddings markers are the markers included in the Paintworks tool kit. The numbers correspond with the numbers on the markers.
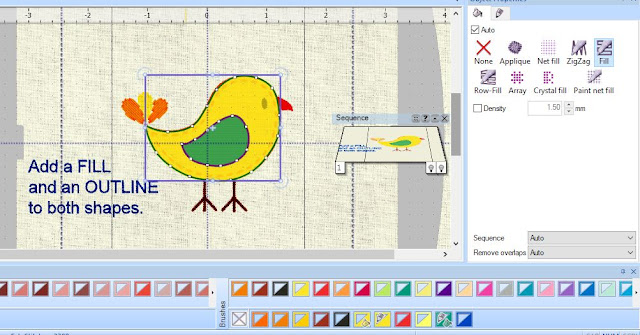
The first step to creating an outline is to use the Outline tool found in the Drawing tools section. The hot key is Crtl +F5
Click on the BOTTOM right of the yellow color chip. A message box pops up and check the appropriate boxes.
Begin drawing your bird outline.
If your design is not as smooth a shape as you would like, you can move the nodes to round it off.
Hit the SPACE BAR and the add an outline to the shape by clicking on the top left line of the color chip.
Follow the same steps for the bird wing but select GREEN as your color chip.
Select Green for the wing and then outline the wing shape. Outline the wing following the same steps as for the bird.
Add a fill and outline to the bird body and bird wing.
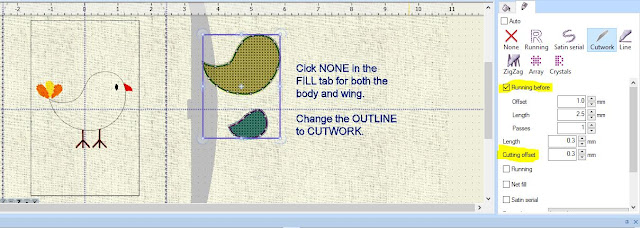
The last step is to remove all of the RGB colors. *This step will allow you to determine what part of the design to keep and what part to delete. Notice the color chips in the above picture and the picture below.
Select Applique for the bird body and the wing. I selected a -.03 offset so it will stitch over the edge of the cutwork fabric. Check Cleaning and Laser Cut. The machine will then add a placement line and stop before it begins the appliqué with this selection.
Here is the final design.
Coming Next... Creating the Cutwork file.


Thanks. I need to get more material later this week for my DIL's tote. Then I will also have time to work on it as my last class this month is tomorrow. Quiet month in which to sew and work on software. Win, win time.
ReplyDelete