Monday, August 21, 2017

Happy Eclipse Day!


Apple of My Eye: FREE Appliqué Hot Pad Quilt Pattern 

Wow- what a year I have had!  I won't go into the details but suffice to say that it has been a rough one.  But it seems to be turning around and I have found more 'mojo' again.  

Some of you may know that the Artistic Suite by Janome and Bernina Design Works are the same program, essentially.  I no longer have Design Works but kept the Artistic Suite because it connects directly to my Silhouette Cameo. They had an update in May and so my screen may not look quite the same, however it is so similar that I will begin again posting some of my creations.

I am pretty excited to see the Fall and Halloween decorations at Michaels and JoAnns.  I decided I need a fall table runner and I purchased some apple print fabric and I started a new project.

I am also teaching a digital cutter class at a local sewing store and the class in September will be how to create cut files from an existing embroidery design. You can find the free pattern here.

The table runner is in the magazine ( a digital download) and has been a plain apple and an apple with core/seeds.  So I started designing and spent all weekend coming up with these basic designs.  Yikes!


I was able to stitch out the plain apple and make the pot holder and I am now working on the blocks.  First one done!


Pot holder for the class.  I wanted to make sure there was a placement stitch for both the apple and the leaves so they could convert it to an SVG file for their machine.


Today our eclipse starts at 1:15 approximately and ends at 4:15.  I will wait for the pictures on the internet since I do not have any eclipse glasses to view this event.  My grandson and I will celebrate in the dark. ( 80%).

I love Burton Ave designs and this Eclipse design is still free here.  Hurry though- you may miss it!


Have a somewhat dark day!


Tuesday, June 28, 2016

Summer is here!

Yes, summer is here and it is hard to find time to sew.  My life has been super chaotic but I had to take time to prepare a few samples for the "Home Sweet Home" event at the Bernina Sewing Center in Tampa, FL.

As part of my presentation, I created a barbecue apron and chef's hat.  The design for the barbecue apron came from Bernina's Inspiration Magazine #64. 


Here is the link for the BBQ signs file and a picture of the apron from the magazine.  If you would like a free pattern to make your own barbecue apron, you can find a link here.


The file for the chef's hat came from the Bernina International site.  You can find the link here for the DRAW file.  If you would like to make your own chef's hat, you can find a free pattern from You Can Make This here.


Next up are the towels that I designed to accompany this ensemble.


Thursday, April 21, 2016

Converting Cutwork files into Silhouette files

If you are a lucky Diva, then you have the Bernina DesignWorks software AND a Silhouette Cameo!  I definitely use the Cutwork tool to cut multiple pieces for my larger projects, but when I need only one wing and one bird body, I use the Silhouette Cameo.

It is easy to convert the cutwork file to a Studio file following the tutorial below. Using the original cutwork file, delete the red basting box and change the cutwork back into a Line design.


Next >Right click>Break Apart

Next>File>Export>to SVG  Name the file Colorful Bird_SVG

Open the file in your Silhouette Cameo software. **You must have the Designer Edition to open SVG files.

File>Import to Library>Select Colorful Bird_SVG (yes, I made two files!)


Next> Load it onto your mat.


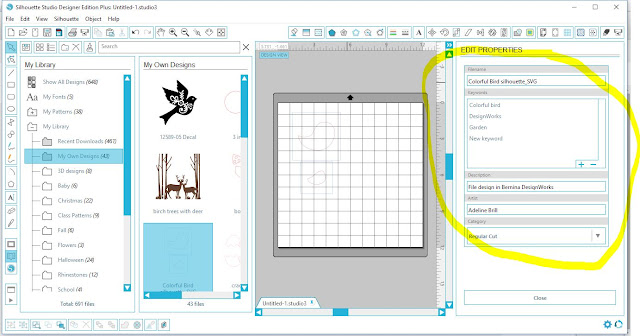
Be sure to EDIT PROPERTIES and add your keywords, description and artist name!  Then later on, you will be able to find it easier!


Close "My Library" and the EDIT PROPERTIES panels.  The design comes in grouped and with a compound path.


Next> Select the bird and outside square>Group  
Select>Select the wing and outside square>Group

Next> SCALE the Bird to 3" and the wing to 2"


Next>Make Compound Path SAVE AS>Colorful Bird>Studio


Now you are ready to cut it out!  I iron Heat and Bond Lite t the back of the fabric and peel off the paper.  I cut the fabric pieces to fit in the grid space, for example the bird fabric piece is cut 4" x 4" and place in the corresponding space.

I have the best luck with the following settings on my machine but your machine may be different.


Here is my finished project.  I am not happy with my choice of fabric because it created a spot above the eye.  Oh well...


Next up - a lady bug design!


Monday, April 18, 2016

Creating a Cutwork File

The next step in this tutorial is to create the cutwork file for the bird appliqué. Once you have your final design, it is quite easy to change it to a cutwork file.


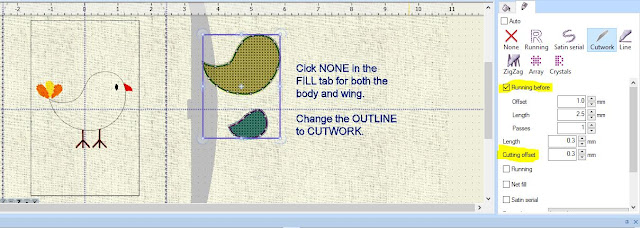
The first step is to drag the bird body and bird wing off the hoop.  Follow the directions in the picture to change the shapes to a cutwork file.


I then copy and paste the shapes into a NEW file.  I usually change the Cutting Offset to 0.3mm to make it larger so the blanket stitch covers all of the fabric pieces.

The file will come in grouped and so the first step is to ungroup them.

Using the rectangle shape, I draw a rectangle around each shape and resize it to a basic shape such as 3" x 3".   This rectangle is the size of the cut fabric and you will place your cut fabric in this square.

I always center the designs within each rectangle using the alignment tools. Then I change the line to a Running stitch with a length of 3.0.

I then make a duplicate of the rectangle and reduce the size by a 1/4" or 2.75" x 2.75".  I change the color to red and a running stitch of 3.0 as well.

I combine the blue running stitch rectangle and place them first in the design.  I combine the red rectangles and place them second so they will sew out after I have placed my fabric in the hoop. Then the red stitching will baste the fabric to the hoop.

To combine designs > Select both trays in the sequence manager>Right click on the designs in the hoop>Combine.

The last step is to select the bird body and the wing shape and Combine them. This step will then cut out the #1 blade position in both shapes, the #2 etc.


Notice the trays in the Sequence Manager.  Your designs should look like mine!
I always add these steps to all of my cutwork designs.

Cut the bird fabric - 3" x 3" and the wing fabric 2" x 2".  

Hoop the Medium/Heavy Tear Away stabilizer and stitch out the blue fabric frames.  Cut the fabric pieces following the measurements above. Back with AppliKay Wonder or your favorite stabilizer.  Spray the stabilizer and place the fabric pieces in their respective frames.

Stitch the red frame shapes- this is the basting box. Stitch the running stitch around each shape.

Change to the Cutting Tool.  Be sure to use the Cutwork plate, foot #44C and start with blade turn #1.  Cut away!

If this is your first Cutwork design from start to finish, CONGRATULATIONS!

You may download my Colorful Bird file DRAW here.

Coming next....How to convert this cutwork file to a Silhouette Cameo Studio file.


Tuesday, April 12, 2016

I love to hear the birds!

My home is surrounded by a conservation area and we have plenty of birds flying around.  Our favorites are the Sand Hill cranes but they do make so much noise!

Today's lesson is using any one of the Colorful Birds, since they are all the same - just different colors!

I selected the orange bird but as you can clearly see, everyone is exactly alike!

You can find the jpg for the bird here.

Follow the same steps as the trowel including resizing the design to fit into the rectangle. This time I did not set a specific size but I tried to make it fir nicely inside the rectangle. As always, I set the "x" and "y" axis at 0 and this centers the design in the middle of the hoop.


I did HIDE the Backdrop because it was distracting.   You can review the steps following this post here.


Today's lesson is a combination of Paintworks and Cutworks using the Bezier drawing tool.

If you need a lesson or a review of the drawing tools, check out the video below.


Before I started 'painting', I changed the palette to the Eddings markers.  This way I could select the colors from the paint pens I already own.


I started with the tail feathers and changed the color using the Eddings markers that I have on hand.  I then changed  the FILL to a Zigzag and the DENSITY to 1.30.


I colored the beak red, the feet brown and the eye black.  Remember the Eddings markers are the markers included in the Paintworks tool kit. The numbers correspond with the numbers on the markers.


The first step to creating an outline is to use the Outline tool found in the Drawing tools section.  The hot key is Crtl +F5


Click on the BOTTOM right of the yellow color chip.  A message box pops up and check the appropriate boxes.


Begin drawing your bird outline.


If your design is not as smooth a shape as you would like, you can move the nodes to round it off.


Hit the SPACE BAR and the add an outline to the shape by clicking on the top left line of the color chip.

Follow the same steps for the bird wing but select GREEN as your color chip.


Select Green for the wing and then outline the wing shape. Outline the wing following the same steps as for the bird.


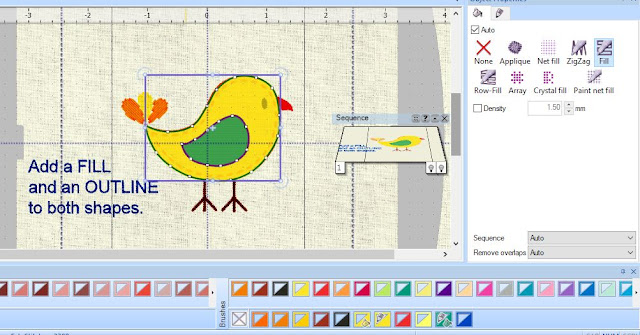
Add a fill and outline to the bird body and bird wing.


The last step is to remove all of the RGB colors.  *This step will allow you to determine what part of the design to keep and what part to delete.  Notice the color chips in the above picture and the picture below.

Select Applique for the bird body and the wing.  I selected a -.03 offset so it will stitch over the edge of the cutwork fabric.  Check Cleaning and Laser Cut. The machine will then add a placement line and stop before it begins the appliqué with this selection.


Here is the final design.


You can download the DRAW final here.

Coming Next... Creating the Cutwork file.


Wednesday, March 30, 2016

'Painting' A Garden Trowel

Today's lesson is my go-to garden tool.  The garden trowel.  It is an easy lesson as well because it is a painted trowel.  So it is perfect for you to give it a try!

The Daily Art Hub design collection is called Gardening Things and you can find the entire collection here.   This is the collection that I had picked out originally when I saw the article in Creative Machine Embroidery.

You can find the find the jpg file for the trowel here.  Right click on the image and "Save AS".  Create a new folder called "Garden Tote Tutorial" and save all of your designs there.


The first step (after you open the software and 'work through the wizard') is to Select NEW  and then load the jpg and select the Oval hoop with foot #93 in the Artwork Source screen.


Then select the Trace (Convert to Outlines)  option.


Then select Trace


Then select Finish.   Your screen should look like this.


Now wasn't that EASY?! The traced design is loaded ON TOP of the backdrop.


Now we need to be able to see how large our design is and if it will fit into the pocket area. To do that we have to OPEN a new file and load it into the software. Select Open and locate where you saved the Rectangle shape_DRAW file that you created.

Here is the file if you have yet to create your own.


Then COPY (right click on the file) and PASTE (right click on the file) the design onto the trowel screen.  Change the rectangle to a Running Stitch with a Length of 3.5".  This will be our basting box.


Drag the rectangle off of the design and place it to the side.  We will now work on the trowel design.  You will drag it back onto the hoop when you are ready to resize the design.


Notice the white background behind the trowel?  The next step is to grab it and delete it.


Done!


Then we need the trowel going in the other direction. So type in 270 degrees in the ROTATE box in the Tool Options.


The trowel in the background is the Artwork image.  If you would like to HIDE the image, follow the sequence below by Right clicking.

>VIEW>Backdrop>Hide

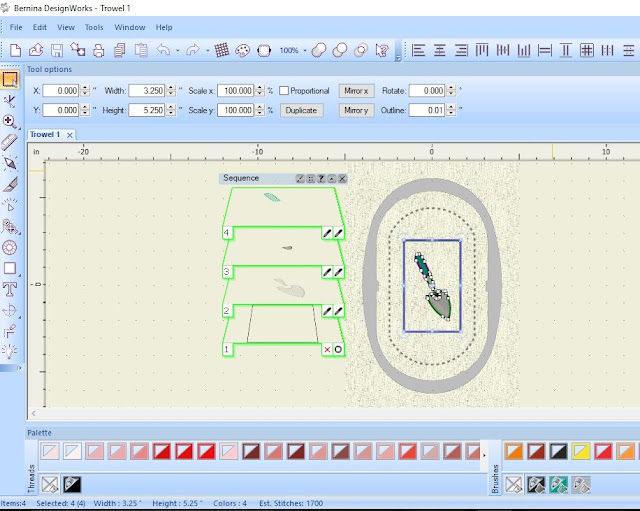
If you drag the rectangle back onto the image, you can now see that the design is too large for the space.


So drag the rectangle back off the image.  Grab the rotated image and using the resize handles, drag it to fit inside the rectangle.


After I resized it to fit into the rectangle, I added both an outline and fill for each color.  Notice the 'paint' chips on the lower right of the photo below.


Remember, I changed the Rectangle from a Paint line to a Running stitch 3.5" in length.  This is the basting box for the design.

Drag the rectangle to the beginning of the Sequence Manager so it will stitch first.  Right click on the both of the light gray parts of the trowel and select Combine.   This will paint both sections at once.  

You can find the finished DRAW file here.  This file can only be opened in the DesignWorks software.

FILE>OPEN>trowel 1.DRAW

You can find the finished EXP here.  This file must be opened in V7 or Artlink first.  You then must send it to your machine or USB stick to paint it out.

FILE>EXPORT>Bernina

I then tested out my paint design.  I used two Fabrico ink pens ( my gray is almost gone!) #165 Pine and #181 Cool Gray plus Eddings #12 Gray.


I lowered the green pen closer to the canvas because I didn't like the striped effect.  


I centered the design using the "bullseye" screen and the marked horizontal and vertical lines.  My rectangle is 'spot on' the top markings are wrong...


The fabric must have shifted slightly while painting but I called it good!


Thanks for hanging in there with this super long tutorial!


Why not give it a try?!